Thursday, April 26, 2012

Buffalo Chicken Sliders

This is probably the easiest meal / snack / whatever you want to call it anyone can make, trust me, it is very hard for anyone to ruin this. So my sister Claudia has a weird obsession with Sliders, every time I ask "What should I make for dinner?..or what should I make for Ben's party? " etc. She ALWAYS, never fails to say Sliders, the weird part is she doesn't even eat meat, not that you necessarily have to eat meat to eat sliders, but yeah..that's Claudia for you, so my love Caya here are your sliders.


You will need..


A Crockpot
4 Chicken Breasts
Your favorite Hot Wing Sauce
Provolone Cheese
Lettuce
Pepper
Mini Burger Buns
1/2 cup of Water
Cooking Spray


I used Tony Roma's Wing Sauce for no specific reason..I think Franks is a popular one..so choose your favorite :) I got the mini buns in the Target Bakery.


I kid you not, I prepped this meal before work in like 5 minutes max, if that. That includes looking for my crock-pot that Daniel hid very well in our pantry. I try using our crock-pot for more than heating nacho cheese or as they say in Texas..Queso..anyway I got this little gem for my wedding from Daniel's grandma, and its lasted almost 6 years now, I love it, and every working person should own one.


So spray the pot with cooking spray and pepper your chicken breasts, notice I used frozen and it came out fine. I poured my wing sauce over it, and added a 1/2 a cup of water to the bottom of the pot. You can use as much wing sauce as you can stomach, in my case I used I'd say 1/4 of the bottle. Then added more later.

Set it on low, and go on about your day! I was gone for over 9 hours and it didn't burn. My guess is, if you use non frozen chicken you would cook it for 6 hours on low.
...9 hours later I shredded the chicken and you can add more wing sauce until you're satisfied.


From here its very obvious..toast your buns a little, add the shredded lettuce, I like provolone cheese so I added a slice, but Blue Cheese would be good too, add  your shredded buffalo chicken, and there you have it..Buffalo Sliders!

And if anyone is wondering, this is Claudia <3

-Gloria

Tuesday, April 17, 2012

Tilapia Ceviche

Its gone from winter to spring almost immediately here in South Texas, and what better than Ceviche on warm days. If you don't know what Ceviche is..ahh I am so sorry, seriously, and uhmm who are you? But at the same time aren't you glad I am providing this awesome recipe for you. Also this is award winning ceviche, since yes back in 2005 or 2006 Daniel and I won ceviche fest..haha, I need to find that video of ceviche fest. So here it is!

1 lb of fresh Tilapia or Halibut ( I used Tilapia )
3 Medium Sized Tomatoes
1/2 Onion
30-40 Limes
1/2 Cucumber
1 Cilantro Bunch
3 Serrano Peppers
Salt
Pepper
Tostadas
Tapatio Hot Sauce

Vegetables..or Fruit. Can someone confirm if tomatoes are a fruit or what is their deal?
Tilapia...why does this picture gross me out so.bad.? but the end result is so worth it.

Okay, start with slicing the fish into small cubes,  and once you're doing slicing it refrigerate while you squeeze your limes.

Freshly squeezed lime juice.
Pour all of the juice over your fish, and put down the fish as compact as you can. You want each piece of fish to be touching the lime juice.

Unfortunately I have bad news guys, this recipe takes a while to make only because the fish is going to cook in the lime juice, something about the acid in the lime, and who knows what, Daniel talks a lot when it comes to science. So I let this "cook" overnight turning the fish a couple of times to make sure you don't eat anything raw.

This is what you want your fish to look like after 8 hours. To be honest I've made this and eaten it in like 3 hours. But hey, I must have really been hungry and anxious to eat this, and no one likes me when I'm hungry, geez I don't even like me when I am hungry.. I would prefer to play it safe and let it sit in the fridge for the 8 hours.

So now that your fish is is ready, you can chop all your vegetables, and toss it with your fish. Add Salt & Pepper, and that is it.


Grab your tostada add some ceviche and eat away, I top mine with an "pacodo" ; avocado, I just love how Ben pronounces avocado. If the serranos are not spicy enough for you, then top it with  your favorite hot sauce, mine is Tapatio :)
Hope you guys like it!!


Monday, April 9, 2012

Breakfast Chiles Rellenos

Oh heeey guys. I have not posted since last Thursday, and I feel like its been months. I really enjoy reading the comments from people throughout the world, yes world. It is so nuts to me to see all the awesome pictures from all the bloggers who post on my page, and then mine are so dorky taken with my cracked screen iphone 3g..haha, well what can you do, actually I do know what you can do, you meaning Daniel, I need a camera for my birthday.

So, I am not big on breakfast at all, actually I hate breakfast, my idea of a good breakfast are frozen wal-mart pancakes. I actually hate wal-mart, but I love their frozen mini pancakes. I posted a picture of this recipe on my instagram a few weeks ago, and my mom and sisters blew up my phone over this recipe, seriously guys let me sleep. So here it is, a healthy version of one of my husbands favorites, Chiles Rellenos. What you'll need..

Poblano Peppers
Queso Fresco
Eggs
Salt
Pepper

Pico De Gallo Recipe
2- 3Tomatoes
1 - Serrano Peppers
1/3 of an Onion
1/4 of a Cilantro Bunch
Salt
Pepper


You'll start with pre-heating your oven at 400 degrees, washing, and drying your poblano peppers, and you want to grill / bake them on each side for 10-15 minutes. Before & After picture below


While your poblano peppers are in the oven, you can grate your queso fresco, I prefer cacique brand, but any queso fresco will work, also make your pico de gallo while the peppers are cooking. The pico de gallo is super easy to make, chop all your veggies, and mix them all together, add salt and black pepper to your liking, and thaats it.


 When I originally made this recipe, I used feta cheese, but the husband isnt a big fan of feta, but both cheeses work perfect.
Cacique- Queso Fresco


                                                       ..After pepper picture I promised


When your peppers are ready to take out, you will quickly remove them from your baking rack, and put them in a plastic bag, and close it. The bag will quickly steam up, and you want to leave them in there for 15-20 minutes while they cool. You do this in order to make it easier to peel off the burnt skin, little trick my momma taught me.


..peel that thick burnt skin off, you don't want to eat that.

Once all your peppers are peeled, cut a little slit straight across down one side of the peppers, this is where you will stuff them with your grated cheese.


After stuffing, you will put them back in the oven for 10-15 minutes, just to melt the cheese a little. Meanwhile, you can cook your eggs to your liking, I'm a simple gal..scrambled eggs for me is fine, but I know some people like to get fancy with their over easy, sunny side up, poached eggs etc, you get the point. Just cook your eggs, and top the eggs over your melted cheese stuffed pepper.


..and finally top it with your pico de gallo, and eat away..Enjoy !


Thursday, April 5, 2012

Veggie Pizza

I have yet to meet someone who does not enjoy a slice of pizza, I love it, for me personally, what can make or ruin a pizza is the crust, crust IS the best part of the pizza, maybe it is just my love of carbs, siiighh, I just love crust..soo..much. Anyway, I love making this veggie pizza at home, its fast, easy, and oh, so good.
So you can use any vegetables you prefer, but I'll list what I used..


Zucchinni
Red Onion
Mushroom
Cherry Tomatoes
Fresh Jalapenos
Slice pickled peppercinnis
Tomato Sauce
Feta Cheese
Naan Bread


Veggies!

Naan Bread, I buy it at either Super Target or HEB ( best store ever )

Start by chopping all your vegetables, pour some olive oil, or in my case I used Vegetable Cooking Spray, see I am trying to be healthier :) Sprinkle salt, and pepper, and pop them in your 350 degree pre heated oven for 15-20 minutes

Look at these little guys! they are so cute and good

So grab your naan bread, and spread your choice of tomato sauce, last night I used a spinach, goat cheese spaghetti sauce ( HEB ) I used about 1 1/2 tablespoons


From here, you can top it with your choice of roasted vegetables, and finally I topped with feta cheese, and put it back in the oven for another 10-15 minutes at 350 deg. If you have a baking / cooling rack I would suggest to use that, so your naan wont get soggy! Remember, I hate soggy.


..10 minutes later the Naan bread is crispy, and ready to devour


even Ben loves his veggie pizza, and this kid is hard to please when it comes to food. I love the feta cheese stuck in between his teeth, dork hehe.  I had this pizza with a glass of my sisters homemade Sangria, it was perfection.

Sunday, April 1, 2012

Macaroni & Cheese

This post is dedicated to our 1st friend we made in San Antonio, Eddie, and one of Daniel's best friends Mr. Rejjie Kush himself. They are my biggest mac n cheese fans, and for that I love them even more :)


So, after you guys make this be prepared to make for every holiday party, or pot luck you are invited to, seriously, its so good, creamy, and just down right bad for your health, but what delicious food isn't? I've been making this mac n cheese for about 3-4 years now, and I'm pretty sure I always gave everyone the recipe wrong, because I eyeballed everything, but today I measured everything for the blog's sake, so here is what you guys will need.


1 bag or box of  Cavatappi pasta ( Cork Screw ) see picture above
1 2/3 cup of Milk
1 1/2 cup of Shredded Cheddar Cheese
16 oz of Velveeta, cut in cubes ( if you're lucky enough to live in the great state of Texas, buy HEB brand, trust me) This is obviously sarcasm, but really HEB Velveeta cheese is so much better.
3 tablespoons of butter
1 pack of Bacon
1 packet of Ritz Crackers
1 teaspoon of flour
Black Pepper


Start with heating your oven to 350 degrees, and laying out your bacon on a cooking sheet, layered with foil. Bake the bacon for 15 minutes, 15 minutes later it will look semi-raw, but you want it to look this way, you will finish cooking it later.


While your bacon is cooking, you can also boil your pasta, and start crumbling the pack of ritz crackers, I crumble as small as I can with my hands, you can obviously do this faster with a food processor, but you get benefits from doing it by hand, you will have theee softest hands, hmmm I wonder if ritz crackers will gave my face the same soft skin benefits, will try making a scrub, and let you guys know..., bottom line crumble by hand. Once that is done, and you've realized how soft you're hands are now, you can begin the cheese.


Melt Butter, and throw in your teaspoon of flour, and stir together until it looks like the picture above.
Add milk, and pepper, keep whisking until milk starts boiling, you don't want to add the cheese to cold milk.
So this is where the goodness begins, add the cubes of Velveeta Cheese, and whisk away, until there are no lumps of cheese. You want to have your heat set up at low-medium, the cheese will start burning and stick to your pot if you have the heat to high and are not whisking enough. 
Add your shredded cheddar cheese to the pot, and keep whisking, it will melt fast, you will know your cheese is ready when it falls from your whisk with no lumps, if there is lumps, then obviously keep stirring :) its a good arm workout..haha

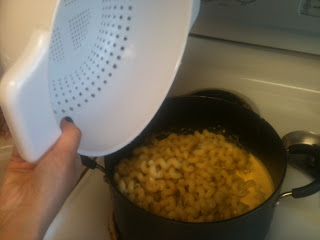
Toss in your cooked, drained pasta into the cheese, and stir together, try making sure each pasta is covered with cheese
Look at this deliciousness!

now that the pasta is covered in cheese, you can pour the pasta into a casserole & pour your crumbled crackers over the top of the mac n cheese.
 In the midst of making the cheese, and covering the pasta in the cheese, you can chop your bacon into small bits and pour the bacon over the now cracker topped pasta
See how the bacon looks not fully cooked, this is fine! Because we are putting it back into the oven for 15-20 minutes at the same 350 degrees. 
and here is the final product, Oh my YUM, I really hope anyone who reads this will never make boxed mac n cheese again, because 1. its gross, and 2. this is easy, and soo good. 

-Gloria